We're not gonna talk about the season-of-the-year Spring, but the Springs in the 13xx and 22xx families of Crosman pump and CO2 guns. There are only four (4) springs in these guns... or five (5) if you count the BackPackers' quick change carbine stock spring.
Lets list them first along with their location, function and modifications (if any) and comments as needed.
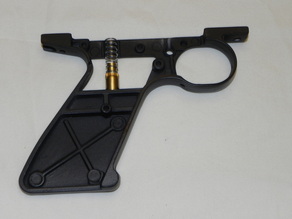
1. The Backpacker Quick Change Spring
... is located within a release pin in the grip / trigger frame hole just below the tube (right next to the rear grip / trigger frame screw that screws up into the tube and rear tube cap). All of the modern 13xx and 22xx grip / trigger frames have these holes (just not the pin/spring), so ALL of these frames have the capability for a carbine stock with no grip screws.
Its function (along with its pin) is to provide a catch for the BackPacker carbine stock that is in all ways the same as the 1399 except for its lack of screw holes in the grip frame location. You slide it on as usual, but instead of attachment screws the carbine stock catches on the spring / pin and holds it very tightly in place. It eliminates the small amount of up/down slop that most 1399 carbine stocks seem to have unless one puts some padding in the right spot to make it go away. With the pin/spring in place, to release / remove the carbine stock requires that you simply depress the spring/pin so the carbine stock will slide off.
I like this feature, but it simply BEGS for a one-piece set of grips (wraparound?) that can go on just as quickly and make use of this pin/spring as well. We'll save that idea for another day. ;)
2. The Safety Spring is located on top of the safety and safety ball bearing. Its only functions are to keep a small amount of pressure on the safety ball for the safety to behave correctly... and to be lost when it you least need or expect it. Just remember when disassembling the trigger frame from the tube to keep the tube and trigger frame UP as you slowly lift the tube from the frame (or slowly lower the frame from the tube). If you do this upside down then chances are the spring and/or the ball will cease to exist this to
3. The Sear Spring is located behind the grips and between a lower frame base and the bottom of the sear. I have already made a blog entry about this, so lets move right along.
4. The Valve Spring is located inside the valve between the valve pin and the face of the valve. It pushes towards / against the valve release pin to keep the valve in a normally closed state. When the valve opens (gun is fired) this valve spring begins pushing to close the valve just as soon as the energy of the hammer that opened it is spent.
The valve spring affords opportunity for behavioral change to your gun as well. A heavier valve spring may be a part of a system that uses less CO2 in a 22xx family gun. A lighter hammer spring may accomplish the same thing. A lighter valve spring may increase the dwell open time enough to add power (and use additional CO2 that might not be put to good use (wasted). A heavier hammer spring may accomplish this same thing.
5. The Hammer Spring is located at the breech end of the tube... just behind the hammer. its purpose in life is to propel the hammer into the valve pin (overcoming the valve spring momentarily) to release the air or CO2 that exhausts from the valve to blow a projectile out of the barrel. Given the fact that the hammer energy comes from the hammer spring, hopefully you can see that there is a bit of tuning opportunity within the give and take of the two springs. Most modders / tuners instinctively go for changes in the hammer spring simply because they are easier to do, more readily available, easier and cheaper to purchase, and perhaps easier to understand what you're doing (or trying to do).
The stock hammer spring is a simple spring that is pent up between the hammer and the rear tube cover. When we cock our guns, the hammer slides back (compressing the spring) and is held in a ready to fire state when the sear catches the hammer to hold it in position. To exaggerate to extremes, too weak (or short) of a hammer spring and your CO2 gun may not even fire (or certainly not pierce the new CO2 cartridge you just installed). That's no good! Too heavy (or long) of a hammer spring may prevent your gun from cocking or may waste CO2.
There are also Power Adjusters (actually hammer spring tension and stroke adjusters). I am a fan of these since there are times when I wish to shoot for maximum power... and others when I want repeatability and to conserve CO2. Having a Power Adjuster (PA) is like having a pocket full of different hammer springs at your disposal but without having to change them in and out. Crosman has a nicely functional PA. I am not particularly fond of the plastic knob nor the fact that it is only for the 22xx family of CO2 guns. Aside from that, note that any PA you have or use can be further tweaked and modded with changing ITS spring from the one supplied. You will have a range of spring tension either way, but you can shift that range with a lighter or heavier PA hammer spring change.
Discussion
A few things "spring" to mind before I close this rambling of mine: Many folks know that you can use a 13xx family spring as a stronger spring in the 22xx family guns. And some even know that a 760 spring can be used as a stronger spring in the 13xx family of guns.
If doing some serious tuning with a goal / objective in mind, DO NOT be afraid to "tune" a hammer spring by cutting it. Just go slow (because you can't put it back if you take too much). If you do cut a hammer spring, put the cut end into the hammer recess. I have better luck with this than fingers crossed trips to the hardware store.
Finally, Spring guides can be a good thing in the hammer spring and in the sear spring if for no other reason that to keep the spring from bending / not being repeatable in its duty cycle.
Have Fun Shooting and Happy New Years!
Lets list them first along with their location, function and modifications (if any) and comments as needed.
1. The Backpacker Quick Change Spring
... is located within a release pin in the grip / trigger frame hole just below the tube (right next to the rear grip / trigger frame screw that screws up into the tube and rear tube cap). All of the modern 13xx and 22xx grip / trigger frames have these holes (just not the pin/spring), so ALL of these frames have the capability for a carbine stock with no grip screws.
Its function (along with its pin) is to provide a catch for the BackPacker carbine stock that is in all ways the same as the 1399 except for its lack of screw holes in the grip frame location. You slide it on as usual, but instead of attachment screws the carbine stock catches on the spring / pin and holds it very tightly in place. It eliminates the small amount of up/down slop that most 1399 carbine stocks seem to have unless one puts some padding in the right spot to make it go away. With the pin/spring in place, to release / remove the carbine stock requires that you simply depress the spring/pin so the carbine stock will slide off.
I like this feature, but it simply BEGS for a one-piece set of grips (wraparound?) that can go on just as quickly and make use of this pin/spring as well. We'll save that idea for another day. ;)
2. The Safety Spring is located on top of the safety and safety ball bearing. Its only functions are to keep a small amount of pressure on the safety ball for the safety to behave correctly... and to be lost when it you least need or expect it. Just remember when disassembling the trigger frame from the tube to keep the tube and trigger frame UP as you slowly lift the tube from the frame (or slowly lower the frame from the tube). If you do this upside down then chances are the spring and/or the ball will cease to exist this to
3. The Sear Spring is located behind the grips and between a lower frame base and the bottom of the sear. I have already made a blog entry about this, so lets move right along.
4. The Valve Spring is located inside the valve between the valve pin and the face of the valve. It pushes towards / against the valve release pin to keep the valve in a normally closed state. When the valve opens (gun is fired) this valve spring begins pushing to close the valve just as soon as the energy of the hammer that opened it is spent.
The valve spring affords opportunity for behavioral change to your gun as well. A heavier valve spring may be a part of a system that uses less CO2 in a 22xx family gun. A lighter hammer spring may accomplish the same thing. A lighter valve spring may increase the dwell open time enough to add power (and use additional CO2 that might not be put to good use (wasted). A heavier hammer spring may accomplish this same thing.
5. The Hammer Spring is located at the breech end of the tube... just behind the hammer. its purpose in life is to propel the hammer into the valve pin (overcoming the valve spring momentarily) to release the air or CO2 that exhausts from the valve to blow a projectile out of the barrel. Given the fact that the hammer energy comes from the hammer spring, hopefully you can see that there is a bit of tuning opportunity within the give and take of the two springs. Most modders / tuners instinctively go for changes in the hammer spring simply because they are easier to do, more readily available, easier and cheaper to purchase, and perhaps easier to understand what you're doing (or trying to do).
The stock hammer spring is a simple spring that is pent up between the hammer and the rear tube cover. When we cock our guns, the hammer slides back (compressing the spring) and is held in a ready to fire state when the sear catches the hammer to hold it in position. To exaggerate to extremes, too weak (or short) of a hammer spring and your CO2 gun may not even fire (or certainly not pierce the new CO2 cartridge you just installed). That's no good! Too heavy (or long) of a hammer spring may prevent your gun from cocking or may waste CO2.
There are also Power Adjusters (actually hammer spring tension and stroke adjusters). I am a fan of these since there are times when I wish to shoot for maximum power... and others when I want repeatability and to conserve CO2. Having a Power Adjuster (PA) is like having a pocket full of different hammer springs at your disposal but without having to change them in and out. Crosman has a nicely functional PA. I am not particularly fond of the plastic knob nor the fact that it is only for the 22xx family of CO2 guns. Aside from that, note that any PA you have or use can be further tweaked and modded with changing ITS spring from the one supplied. You will have a range of spring tension either way, but you can shift that range with a lighter or heavier PA hammer spring change.
Discussion
A few things "spring" to mind before I close this rambling of mine: Many folks know that you can use a 13xx family spring as a stronger spring in the 22xx family guns. And some even know that a 760 spring can be used as a stronger spring in the 13xx family of guns.
If doing some serious tuning with a goal / objective in mind, DO NOT be afraid to "tune" a hammer spring by cutting it. Just go slow (because you can't put it back if you take too much). If you do cut a hammer spring, put the cut end into the hammer recess. I have better luck with this than fingers crossed trips to the hardware store.
Finally, Spring guides can be a good thing in the hammer spring and in the sear spring if for no other reason that to keep the spring from bending / not being repeatable in its duty cycle.
Have Fun Shooting and Happy New Years!
 RSS Feed
